Installing Oracle Enterprise Manager Cloud Control 12c Release 3 (12.1.0.3.0) on Redhat Enterprise Linux Server 6.0 x86-64 is a very tedious and time-consuming process that needs some careful planning and neat execution. This is because not only is the OEM CC 12c R3 software huge in size to download, but it also requires a lot of resources in terms of CPU, RAM and disk space, as well as OS parameter tuning and OS package installation.
According to Oracle Corporation, Oracle Enterprise Manager is Oracle’s integrated enterprise IT management product line, which provides the industry’s only complete, integrated and business-driven enterprise cloud management solution. Oracle Enterprise Manager creates business value from IT by leveraging the built-in management capabilities of the Oracle stack for traditional and cloud environments, allowing customers to achieve unprecedented efficiency gains while dramatically increasing service levels.
In my tutorial below, I will demonstrate to you how to install OEM CC 12c R3 on Redhat Enterprise Linux Server 6.0 x86-64.
Time Duration: 45 to 60 minutes (software installation only)
Prerequisites:
1. First of all, read through the OEM CC 12c R3 basic installation guide thoroughly to check whether your system meets the requirements for installing the OEM CC 12c R3 software -
http://docs.oracle.com/cd/E24628_01/install.121/e22624.pdf
2. Also read through the Oracle suggested OEM CC 12c R3 sizing guidelines below -
http://www.oracle.com/technetwork/oem/framework-infra/em12c-sizing-1590739.pdf
3. Ensure that your system meets the requirements, as stated in the documents above.
4. Download the OEM CC 12c R3 software available at the following link:
http://www.oracle.com/technetwork/oem/grid-control/downloads/linuxx8664soft-085949.html
5. Unzip the zip files downloaded (as mentioned in point 4) to a common folder using the unzip utility of Linux operating system.
Installation Process:
Launch the OEM CC 12c R3 installer by executing the './runInstaller' command in the setup directory:
[oracle@oem12c em12c]$ ./runInstaller
Starting Oracle Universal Installer...
Checking Temp space: must be greater than 400 MB. Actual 3589 MB Passed
Checking swap space: must be greater than 150 MB. Actual 6143 MB Passed
Checking monitor: must be configured to display at least 256 colors. Actual 16777216 Passed
Note: The installer needs greater than 400 MB of temp space and 150 MB of swap space, and a monitor capable of displaying at least 256 colours, to start.
1. The first screen allows you to specify your email address for notifications. It is advisable to use your My Oracle Support email address here -

You can also receive security updates via My Oracle Support by clicking the checkbox on the screen. In such a case, you will have to specify your My Oracle Support password too.
Click 'Next' to continue.
2. The next screen allows you to search for updates either from a local directory or from My Oracle Support directly -

You can also skip updates, as indicated above in the screenshot, and click 'Next'.
3. The next screen will perform some prerequisite checks to determine whether OEM CC 12c R3 can be installed correctly on the system -

There are three outcomes for every prerequisite check that is performed -
A. Succeeded: If a check succeeds, then you do not need to bother about it at all.
B. Warning: If a check returns a warning, then you should investigate the issue and try the recommended solution. However, warnings may be ignored too.
C. Failed: If a check returns a failure, then you cannot proceed with the installation unless you resolve the issue.
Click 'Next' to continue.
4. The next screen presents the option to choose the installation type:
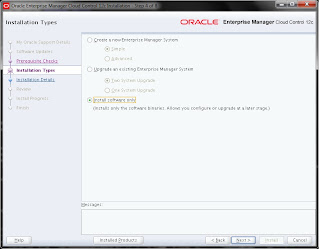
There are three options available -
A. Create a new Enterprise Manager System: This options allows you to create a new Enterprise Manager System using the 'Simple' or 'Advanced' sub-options. The 'Advanced' sub-option allows more customization than the 'Simple' sub-option.
B. Upgrade an existing Enterprise Manager System: This option allows you to upgrade an existing Enterprise Manager System using either a 'Two System Upgrade' or a 'One System Upgrade' approach. For more information on these approaches, kindly check out the following link:
http://docs.oracle.com/cd/E24628_01/upgrade.121/e22625/overview_upg_approaches.htm
C. Install software only: This option allows you to install only the software binaries, and it lets you configure or upgrade the Enterprise Manager System at a later stage.
We will select 'Install software only' and click 'Next'.
5. The next screen presents you with the installation details that you need to enter -

The installation details are as follows -
A. Middleware Home Location: It is the parent directory that contains the Oracle WebLogic Server home, the Oracle Management Service home, the Management Agent home, the plug-in home, the Java Development Kit (JDK), the Oracle Management Service instance base directory, the Oracle Web tier directory, the Oracle common directory, and other relevant configuration files and directories. It must be an empty directory.
B. Agent Base directory: It represents the directory under which the Oracle Management Agent software will be installed. It must be an empty directory.
C. Host Name: It represents the host name of the server machine on which OEM CC 12c R3 will be installed.
6. The next screen allows you to review your installation setup before the installation actually starts -

Kindly notice the fact that 14 GB of space is required by OEM CC 12c R3, as indicated by the screenshot above. Click 'Install' to start the installation process.
7. The next screen will present the installation progress details:

The installation will progress gradually ...

The installation does take some time to complete -

You will be prompted with a message once the installation is complete to execute the configuration scripts as 'root' user -

Kindly execute the 'allroot.sh' script as 'root' user and then click 'OK'.
8. You have successfully installed the software binaries:

Click 'Close' to exit the installer.
Note: You may configure the Enterprise Manager System by running the 'ConfigureGC.sh' script (in the screenshot above) as 'oracle' user. I have explained the process of configuring the Enterprise Manager System in a separate post. Do have a look at it some day!
We have finally finished installing the OEM CC 12c R3 software!
Hope you had a good time reading this article! :)
No comments:
Post a Comment